

Mosaic leveler
Description
Mosaic leveler
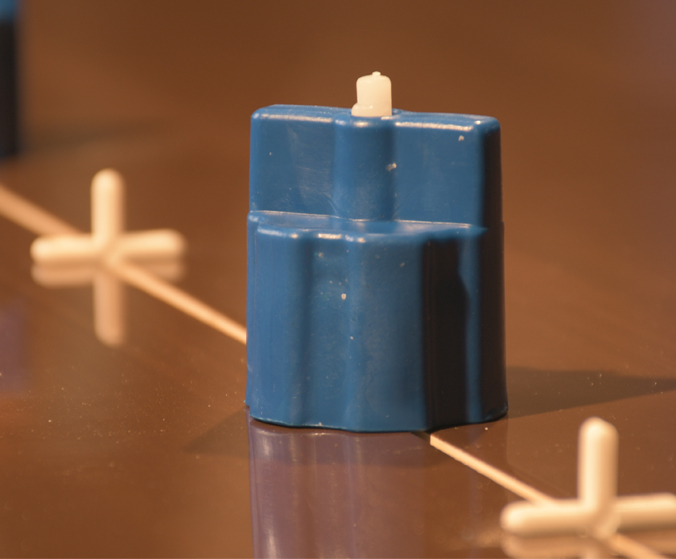
The mosaic leveler consists of two parts, the leveling clip and the leveling wedge. In addition to aligning the surface and aligning the edge of the mosaic, the mosaic leveler also adjusts the band between the mosaics with a distance of 1.5 mm.
properties and effects
- To level the mosaic
- Not using a level to align the mosaic
- No formation of pterygium in the seam of two mosaicsApplication
- The wedge can be used multiple times and reduces costs
- Can be used on horizontal and vertical surfaces
- Increases the beauty and quality of tiling
Package:
| name | paking(QTY) |
| Mosaic Aligner | 50 pairs |
| Mosaic leveling wedge | 50 pieces |
| Mosaic leveling clip | 100 pieces |
Product Description – Mosaic Leveler (Mosaic Leveler)
Mosaic leveling is a topic that cannot be ignored because the use of mosaics for floor coverings has been common for many years. In the traditional method of installing mosaics, in the first stage, special mortar is poured onto the surface and after spreading it with a trowel, the mosaics are placed on the surface and the mosaics are leveled with respect to each other by applying hammer blows and controlling with a level. Today, efficient tiling tools have come to the market for installing mosaics, including the mosaic leveler or mosaic leveler. The mosaic leveler consists of two parts: leveling clips and leveling wedges. In addition to leveling and leveling the edge of the mosaic, the mosaic leveler also adjusts the joint between the mosaics with a distance of 1.5 mm.
Mosaic leveling clips are designed based on the thickness of the mosaic, which is usually 2 cm. When installing the mosaic, the leveling clips are placed between the mosaics and after the mosaics are placed, they are locked by the leveling wedge. The advantage of using mosaic leveling over traditional methods is that there is no longer a need to use a level to level the two mosaics with respect to each other, and the mosaics are aligned with each other more easily and quickly. Similarly, using a leveler or leveler eliminates the possibility of creating a pterygium in the seam of two mosaics and the formation of moss and algae between the joints during the washing process is eliminated.
Mosaic alignment is a subset of tile and ceramic alignment, which aligns the edges of mosaics. Also, depending on the size of the mosaic, you will be able to determine its packaging quantity.
A parquet leveler is a tool used to prepare the subfloor before installing mosaics. This process ensures that the subfloor is completely flat and smooth before installation, so that the mosaics can be installed correctly and have a uniform and beautiful appearance. Leveling the surface before installing mosaics is an essential step in the installation process that can contribute to the final quality of the work and the longevity of the mosaics.
Mosaic leveling packaging (mosaic leveler)
How is the mosaic leveler packaged?
| Product name | Quantity in package |
| name | packing(QTY) |
| Mosaic leveler | 50 pairs |
| Mosaic leveling wedge | 50 pcs. |
| Mosaic leveling clips | 100 pieces |
Mosaic leveling agent consumption (mosaic leveling agent)
How many mosaic tiles are used?
The size of the mosaic leveler or leveler depends on the dimensions of the mosaic and the area to be covered by the mosaic. Given that the leveling wedge is reusable, if the surface is to be mosaiced in several stages, it is better to consider the number of wedges less than the number of clips. In addition to increasing the quality of mosaic work and the beauty of the work, the use of the mosaic leveler will eliminate the pterygium or unevenness between the edges of the mosaic. The mosaic leveler also levels the edges of the mosaic and makes the size of the mosaic strips equal to each other.
Mosaic leveling tips (Mosaic leveling)
What tips should be followed when using mosaic leveling?
- To create a uniform and perfectly level surface, it is recommended to lock the wedge into the leveling clip with a special leveling wrench. Using a hammer or hand to place the mosaic leveling wedge into the clip, in addition to not aligning the two mosaics precisely with each other, may cause the clip to break during the placement operation.
- After installing and placing the wedges, allow time for the mortar under the mosaics to dry completely or to achieve proper adhesion, then proceed to break the clips.
- Considering that the leveling clips are disposable and the wedges are reusable, it is recommended that in situations where the mosaic work is carried out in several stages due to its large size, you purchase fewer wedges than the clips to make it less expensive economically.
How to use mosaic leveler (mosaic leveler)
How to use Mosaic Aligner?
From one corner of the surface required for tiling, use a level and a square to draw a guide line for the placement of the first mosaic. Then, apply a mortar or adhesive for mosaic installation to the area of 2 or 3 mosaics. Place the first mosaic in the specified location and then place the mosaic leveling clips around it. Mosaic leveling significantly increases the speed and accuracy of mosaic and stone installation on the floor and during installation, and creates a completely smooth, level, and uniform surface, which requires the performers to use a mosaic leveling tool. After that, place the side mosaics and fix them by placing and locking the mosaic leveling wedge. In this way, the two side mosaics will be completely level with each other and there will be no need to level to level two mosaics next to each other. Arrange and install the mosaics in the same way by placing the leveling clips and locking them with the leveling wedge.
Mosaic Leveler
The mosaic leveler is a specialized two-component system, consisting of a leveling clip and a leveling wedge, specifically engineered for precise alignment during mosaic installation. Beyond achieving flawless surface flatness and edge-to-edge alignment, the mosaic leveler plays a crucial role in maintaining a uniform 1.5 mm joint spacing between individual mosaic pieces. This precision not only enhances the aesthetic quality of the finished work but also strengthens the structural integrity of the installation.
Properties and Effects
- Perfect leveling of mosaics without relying on traditional spirit levels.
- Prevention of misalignment and height differences at the joints of adjacent mosaics.
- Elimination of pterygium formation (uneven ridges) at the seams.
- Increased bonding quality, ensuring better adhesive contact between mosaics and substrate.
- Reusable wedge component significantly reduces long-term project costs.
- Applicability on both horizontal and vertical surfaces, including floors and walls.
- Enhanced aesthetic appeal and finish quality for mosaic, tile, and stone applications.
- Consistent joint width maintenance across entire surfaces, ensuring professional-grade outcomes.
Application
- Effective for installing mosaics on interior floors, walls, backsplashes, showers, columns, and exterior facades.
- Highly suitable for residential, commercial, and luxury projects requiring high precision and top-tier finish quality.
- Ensures speed, accuracy, and ease of installation even in complex layouts.
- Allows tight and accurate joint control, minimizing the risk of algae or dirt buildup in outdoor mosaics.
Package
| Name | Packing (QTY) |
|---|---|
| Mosaic Aligner | 50 pairs |
| Mosaic Leveling Wedge | 50 pieces |
| Mosaic Leveling Clip | 100 pieces |
Product Description – Mosaic Leveler (Mosaic Leveler)
Mosaic leveling is an essential aspect of modern tiling, particularly with the widespread use of decorative mosaics for flooring, walls, and accent surfaces. In traditional mosaic installation, artisans relied heavily on manual methods—applying mortar, positioning mosaics by hand, tapping with a mallet, and continuously checking alignment with a level. However, manual techniques often resulted in inconsistent surfaces, gaps, or lippage (uneven tile edges).
Today, the mosaic leveler system offers a revolutionary improvement. It consists of leveling clips placed between mosaics and wedges inserted through the clips to align and lock adjacent tiles uniformly. Importantly, the system ensures a precise 1.5 mm grout line, eliminating the guesswork and improving the visual harmony of the mosaic layout.
Mosaic leveling clips are meticulously designed according to the typical thickness of mosaic tiles, often around 2 cm. After setting the clips, the leveling wedge locks into place, pulling adjacent mosaics into perfect alignment. This method reduces human error, speeds up the installation process, and completely eliminates the need for repeated checking with traditional levels.
One of the key advantages of using a mosaic leveler is that it prevents the formation of lippage or protrusions at the edges, maintaining a smooth, safe, and visually stunning surface. Moreover, because the correct distance is consistently maintained, the risk of algae, moss, or dirt accumulation in outdoor installations is drastically minimized.
Mosaic leveling is an advanced subdivision of tile and ceramic leveling systems, specifically adapted for small-sized and intricate tile formats like mosaics. Depending on the mosaic size and installation method, package quantities can be adjusted accordingly to optimize installation efficiency.
The Importance of a Smooth Subfloor in Mosaic Installation
A mosaic leveler not only simplifies tile-to-tile alignment but also indirectly emphasizes the need for a properly prepared subfloor. Before laying any mosaic, it is critical to ensure that the substrate is perfectly smooth, clean, and level. Any irregularities in the base surface can cause uneven tiles, aesthetic flaws, and even structural weaknesses over time.
Using a leveling system alongside a well-prepared subfloor guarantees:
- Improved adhesion and bonding strength.
- Enhanced durability and longer lifespan of the mosaic.
- Consistent visual quality across the entire surface.
Mosaic Leveling Packaging (Mosaic Leveler)
How is the mosaic leveler system packaged?
| Product Name | Quantity in Package |
|---|---|
| Mosaic Leveler | 50 pairs |
| Mosaic Leveling Wedge | 50 pieces |
| Mosaic Leveling Clip | 100 pieces |
Each kit is carefully packaged to optimize usability and project flow. With the wedges being reusable, purchasing multiple clips but fewer wedges makes the system cost-effective for both small-scale projects and large commercial installations.
Mosaic Leveling Agent Consumption (Mosaic Leveling Agent)
How many mosaic leveling components are needed?
The quantity of mosaic leveling clips and wedges required depends on:
- The size and layout of the mosaics.
- The surface area to be covered.
- The pattern complexity (simple grid or intricate designs).
Generally:
- 1 leveling clip per side for small square mosaics.
- 1 to 2 leveling clips per edge for larger mosaic sheets.
- Approximately 3 to 5 clips per mosaic sheet (depending on dimensions and layout).
Because the leveling wedge is reusable, if a mosaic project is executed in multiple stages, it is practical to purchase fewer wedges than clips to reduce overall project costs. In addition to cost-efficiency, using mosaic levelers dramatically elevates the precision, speed, and overall beauty of mosaic work.
Mosaic Leveling Tips (Mosaic Leveling)
What should be considered when using a mosaic leveler?
- Always use a specialized leveling wrench to tighten the wedge into the clip for precise and damage-free locking.
- Avoid using a hammer or hand force, as it may damage the clip and compromise the leveling result.
- After positioning and securing all wedges, allow sufficient drying or curing time for the adhesive or mortar before removing the clips.
- Gently break the clips at their designed break points to avoid damaging the tiles.
- Plan your wedge and clip quantities appropriately if working in phases to maximize material reuse and project cost-efficiency.
- Maintain consistent pressure when inserting wedges to ensure all mosaics are flush with each other without overtightening.
- Inspect clips before use to ensure no manufacturing defects that could impact performance.
How to Use Mosaic Leveler (Mosaic Leveler)
What is the proper method for using a mosaic leveler?
- Surface Preparation:
- Start by cleaning and leveling the subfloor or wall surface.
- Use a level and a square to draw clear guide lines for initial placement.
- Adhesive Application:
- Apply a thin, even layer of mortar or mosaic adhesive over a small section (enough for 2–3 mosaics) using a notched trowel.
- Setting the First Mosaic:
- Place the first mosaic according to the marked guide lines.
- Insert leveling clips around the perimeter of the mosaic tile or sheet.
- Placing Subsequent Mosaics:
- Position the adjacent mosaics.
- Slide the leveling wedge into each clip and use a special leveling wrench to lock them until the surfaces are perfectly aligned.
- Continued Installation:
- Repeat the process of placing mosaics, inserting clips, and locking wedges until the surface is fully covered.
- Final Steps:
- Allow the adhesive to fully set.
- Break off the clips at the base once cured.
- Enjoy a flawless, professional-grade mosaic surface.
By following this process, installers achieve uniform joint widths, perfect surface alignment, and exceptional visual consistency across the entire tiled area.


Reviews
There are no reviews yet.