

Glass block spacer
Description
Glass block spacer
Glass block spacers are designed and produced in two sizes, 10 and 5 mm, and if each of them is used, the same amount of distance will be formed between the glass blocks.
Application
- acts as insulation against cold and heat
- It has high resistance
- It has the ability to reflect light
Package:
Nylon 30 pcs
Product Description – Ceramic Tile Leveler (Ceramic Tile Leveler)
There are many parameters in the topic of ceramic tile installation that, if observed, will make the ceramic tile more beautiful and better usable after installation. One of these important and sensitive parameters is the leveling of the ceramic tile with respect to each other. It has been customary in the past to level or align the ceramic tile with respect to each other by first pouring mortar or tile adhesive on the surface, then placing the tile on it, and then striking the surface with a plastic hammer and continuously checking with a plumb line to level them with respect to each other.
This method of aligning tiles and ceramics has disadvantages, including a significant waste of time, as well as the movement of tiles and ceramics, or so-called sliding due to impact. To increase the quality of tiling and facilitate their leveling relative to each other, plastic parts called tile levelers or tile levelers have been produced and supplied. The leveling spacer consists of two parts: the leveling clip and the leveling wedge, which is the male wedge and the female clip. When tiling, the tile leveling clips are placed between the ceramic tiles and locked by the wedge, causing the tiles and ceramics to be completely and accurately leveled relative to each other, completely eliminating the need for hammer blows and the use of a plumb line, and creating a smooth and even surface that is much better than traditional methods.
The leveling system can also be used to level various types of flooring, such as parquet. In addition to being an important principle in tiling and making the tiling surface more beautiful, aligning tiles and ceramics with each other will also have other advantages, including the absence of water accumulation during washing in the nitty-gritty areas between two tiles, which will prevent dirt from clogging and dulling the joint areas between two tiles.
The leveling wedge should be selected and used according to the size of the ceramic tile. Small wedges are used for thin-thick ceramic tiles and large wedges are used for installing thicker ceramic tiles.
Tile levelers are very useful in installing ceramic tiles, which require high precision and coordination. Using levelers helps to ensure that the surface of the tiles is completely smooth and without inconsistencies, which makes the final result of the work much more beautiful and professional.
Ceramic tile leveling agent packaging
What is the packaging of ceramic tiles?
| Product name | Size | Quantity in package |
| name | size | packing(QTY) |
| Small flat tile leveler | 50 pairs | 50 packs |
| Small clips | 100 pieces | 50 packs |
| Small wedge | 100 pieces | 50 packs |
| Medium tile level | 50 pairs | 50 packs |
| Medium clips | 100 pcs. | 50 packs |
| Large wedge | 50 pcs. | 50 packs |
| Large tile (mosaic) leveling | 50 pairs | 50 packs |
| Large clips | 100 pcs. | 50 packs |
| Very large tile level (concrete wash) | 50 pairs | 50 packs |
| Very large clips | 50 pcs. | 50 packs |
Consumption of ceramic tile leveler
Bed leveling consumption
What is the consumption rate of the bed leveler?
The amount of ceramic tile and tile joint used in tiling is determined by the dimensions of the ceramic tile and the surface area. Smaller ceramic tiles require fewer joints, but larger tiles require more ceramic joints on each side.
- Number of tile levels required for dimensions up to 30*30 cm:
The number of aligners required for small tiles, such as 30×30 tiles or smaller, is one aligner in each corner of the tile. Note that if one aligner is placed in each corner of the tile, the aligner must be placed in the middle of each face.
- Number of tile levels required for dimensions 40*40 to 50*50 centimeters:
For ceramic tiles up to 50 x 50 cm, the number of aligners used is 2 on each side of the tile. It is recommended that the aligners for these dimensions of ceramic tiles be placed 10 cm away from the edges of the ceramic tiles.
- Number of tile levels required for dimensions 60*60 to 80*80 cm:
The number required for these dimensions is 3 on each face. In this way, two parallel ones are placed 10 centimeters from each edge and the third parallel one is placed in the center of the desired face.
- Number of tile levels required for dimensions larger than 80*80 cm:
In larger sizes, an equal number of ceramic tiles should be used for every 20 to 25 centimeters of the length of each side.
Ceramic Tile Leveling Tips
What are the essential tips when using a flat tile level?
- Note that you should choose the level according to the thickness of the ceramic tile or parquet. Usually, medium and large levelers are used for ceramic tile and parquet and small levelers are used for wooden floor tiles. Note that using a large leveler is not suitable for low thicknesses and the wedge inside the clips will not be fully locked. On the other hand, using a small leveler is not suitable for high thicknesses because the wedge cannot perform properly for leveling.
- Be sure to allow enough time for the mortar or adhesive under the tiles and ceramics to set and dry, then proceed to break the ceramic alignment clips. If the mortar under the work has not yet dried, the tiles may sink and slip if they move on the surface, which will disrupt the alignment and order of the tiles relative to each other.
- Whenever possible, use a wrench or special alignment pliers to lock the clips and wedges together. Aligning the ceramic by hand is not possible at all, as there will not be enough pressure to apply to the surface to align. On the other hand, placing the wedge in the clips by hammering is also not a good idea. Because in addition to not aligning the surface perfectly, there is a possibility of breaking the clips due to impact.
- Given that the clips are disposable, but the wedges are reusable. When purchasing, be careful to purchase fewer wedges than clips. For example, if a section with an area of 500 meters is to be tiled in two stages, it is necessary to calculate the required number and purchase half the number of wedges as clips to make it economically viable.
Note:
- If you do not use level tiles in the tile joints, in addition to creating uneven joints, you will have an uneven or so-called pterygoid surface. If the work surface is pterygoid, it not only reduces the quality and beauty of the work, but also provides a suitable space for water to accumulate during washing, which after a while will become a surface with scale and dullness, creating an inappropriate appearance.
How to use ceramic tile leveler
How to use a bed leveler?
Ceramic tile leveling is made up of two parts, clips and wedges, and is designed and produced in several sizes for different thicknesses. First, choose the appropriate ceramic leveling size according to the thickness of the ceramic tile or parquet. Then, to start tiling, try to start tiling from a corner of the desired area as much as possible. In the first step, using tools such as a protractor, ruler, and meter, or using laser meters in the corner, draw two lines at a 90-degree angle to each other to install the first ceramic tile.
Apply tile adhesive to the surface under the work. After tiling the entire surface, according to the method mentioned, allow the tiles to set and adhere completely. Then, by applying a blow with a hammer or the tip of a shoe, the clips will easily break from the point where the vertical plate connects to the horizontal. The horizontal part of the clips will remain under the tiles and the vertical part will come out.
It should be noted that the clips are disposable in the operation of leveling the surface, but the wedge can be used several times. If possible, apply tile adhesive to the surface with a spatula. First, place and fix the first tile or ceramic according to the drawn lines. To place the remaining tiles and complete the layout, place the clips in the desired number according to the dimensions of the tile or ceramic, on each side, and then place the other tiles. After placing the two tiles next to each other, insert the wedge into the slot of the clip that has come out of the joint between the two tiles or ceramics and lock it with a special aligning pliers (tile aligning wrench). After finishing tiling the entire surface, according to the method described, allow the tiles to fully adhere and adhere. Then, by applying a blow with a hammer or the tip of a shoe, from the side, the clips will easily be left behind from the connection point of the plates and the vertical part will come out. It should be noted that the clips are disposable in the surface leveling operation, but the wedge can be used multiple times.
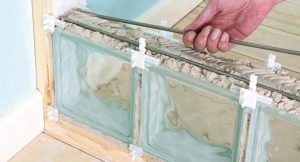
Glass Block Spacer
Glass block spacers are essential tools designed to ensure precise, consistent spacing between individual glass blocks during installation. These spacers are manufactured in two standard sizes—5mm and 10mm—providing the flexibility to create exact separation distances based on architectural and design needs. By maintaining uniform spacing, these tools contribute to the structural integrity, aesthetic alignment, and insulation performance of the glass block wall system.
Key Features and Advantages
- Thermal and Acoustic Insulation: By providing a consistent gap between blocks, these spacers reduce direct material contact and minimize thermal bridging, enhancing the insulation properties of the structure.
- Light Reflection & Diffusion: Glass blocks are widely used for their ability to transmit and diffuse light. Uniform spacing ensures a balanced and symmetrical appearance that maximizes natural light usage.
- High Mechanical Strength: Made from durable plastic, the spacers are resistant to deformation under pressure, ensuring long-term performance during the block-setting process.
- Precision in Alignment: The use of these spacers eliminates inconsistencies in block placement, resulting in clean grout lines and a more professional finish.
- Easy to Use: These spacers are lightweight, easy to insert and remove, and can be used with both cement-based and adhesive-based glass block installations.
Applications
- Residential and commercial glass block walls
- Interior and exterior partitioning
- Decorative or functional use in bathrooms, stairwells, corridors, and industrial buildings
Packaging
- Size Options: 5 mm & 10 mm
- Packing: Nylon bag containing 30 pieces
Ceramic Tile Leveler
Achieving a perfectly leveled tile surface is one of the most critical aspects of tile installation. Traditional methods often lead to uneven surfaces due to tile shifting, human error, or inconsistent pressure application. The ceramic tile leveling system—consisting of clips and wedges—offers a modern, highly accurate solution for aligning tiles uniformly. This system ensures that all tiles sit at the same height, eliminating lippage and providing a seamless, polished finish.
Components
- Leveling Clips: These are inserted between tiles to create uniform spacing and hold tiles in position.
- Leveling Wedges: Inserted into the clips to apply downward pressure, locking the tiles in place during drying.
Advantages
- Perfect Tile Alignment: Prevents uneven tile edges and ensures consistent surface leveling.
- Reduces Tile Movement: Eliminates tile shifting during adhesive curing time.
- Increases Installation Speed: Speeds up the tile-laying process with reduced need for manual leveling.
- Reusable Wedges: Designed to be durable and reused across multiple projects.
- Enhanced Finish: Provides a smooth, elegant tile surface with professional results.
Applications
- Wall and floor ceramic tile installations
- Porcelain, granite, mosaic, and stone tile applications
- Residential, commercial, and industrial tiling projects
Packaging Specifications
| Product Name | Size | Packing (QTY) |
|---|---|---|
| Small Flat Tile Leveler | 50 pairs | 50 packs |
| Small Clips | 100 pieces | 50 packs |
| Small Wedge | 100 pieces | 50 packs |
| Medium Tile Leveler | 50 pairs | 50 packs |
| Medium Clips | 100 pieces | 50 packs |
| Large Wedge | 50 pieces | 50 packs |
| Large Tile Leveler (Mosaic) | 50 pairs | 50 packs |
| Large Clips | 100 pieces | 50 packs |
| Very Large Tile Leveler (Concrete) | 50 pairs | 50 packs |
| Very Large Clips | 50 pieces | 50 packs |
Consumption Guide
The quantity of tile levelers required depends on the tile size and total area:
- Up to 30×30 cm tiles: Use 1 leveler at each corner (typically 4 per tile).
- Tiles sized 40×40 to 50×50 cm: Use 2 levelers per side (8 per tile), spaced 10 cm from the edge.
- Tiles sized 60×60 to 80×80 cm: Use 3 levelers per side—two near edges and one at the center.
- Tiles larger than 80×80 cm: Use one leveler every 20–25 cm on each side.
Best Practices and Usage Tips
- Select clip and wedge sizes based on tile thickness.
- Do not hammer the wedges in place—use tile leveling pliers for accurate pressure and locking.
- Allow sufficient time for adhesive to dry before breaking clips.
- Place clips at corners and sides consistently for even leveling.
- Clips are single-use, but wedges can be reused multiple times for cost-efficiency.
Installation Instructions
- Prep the Surface: Clean and mark the tiling area, ideally starting from a 90° reference line in the corner.
- Apply Adhesive: Use a notched trowel to spread tile glue evenly across the surface.
- Place the Clips: Insert clips along tile edges based on tile size.
- Set the Tile: Press the tile into place and insert the wedge into the clip.
- Tighten: Use leveling pliers to lock the wedge into the clip, applying pressure.
- Finish the Surface: After adhesive cures, gently kick or tap the wedge laterally to break the clip, leaving the flat portion beneath the tile.
Final Note
Ignoring tile leveling systems can result in an uneven, unprofessional tile surface prone to moisture accumulation, grime buildup, and aesthetic defects. Investing in a tile leveling system enhances both the visual and structural quality of your tiling projects.
Reviews
There are no reviews yet.